Posts

#6 Splunk sub(Commands) [fields, rename, replace, table, transaction]

FIELDS:  This command helps to keep or remove specified fields from the search results, below command will keep just three fields in your search result. Example: | fields request, rc, pt RENAME:  This command helps to rename field(s), below command will rename a field named as service to serviceType and RC as responseCode Example: | rename service AS serviceType, RC AS responseCode REPLACE:  This command helps to replace the values of fields with another value, below command will replace the values "fetchReport" and "viewReport" as "Report" in "serviceType' field. Example: | replace fetchReport with Report, viewReport with Report in serviceType TABLE: This command helps to format the results into tabular output. Example: | table request, rc, pt TRANSACTION:  This command helps to merge events into a single event based upon a common identifier, below command will create events based on two events i.e. it will fetch the txn-id w...
#5 Splunk sub(Commands) [sendemail, dedup, eval, concatenate, new_field]

SENDEMAIL:  This command helps you to send an email straight away from the search head itself. you just need to pass couple of values to it. For instance to whom you want to send the email, if you want to keep anyone in cc/bcc, change the subject line (by default its "Splunk Results"), sendpdf(true or false) i.e. the results, set the priority of the email, give a message i.e. the body(if required). Example: | sendemail to ="XYZ@gmail.com" subject ="Test Search Results" sendpdf =true priority =highest message ="Please find attached latest search result" sendresults =true DEDUP:  This command helps de-duplicate the results based upon specified fields, keeping the most recent match. Example: | dedup txn-id EVAL:  This command helps to evaluate new or existing fields and their values. There are multiple different functions available for eval command. Lets say you want to add a new field, for doing so you can use something like given belo...

Enable receiving port on Splunk server

Image
Prerequisite: Make sure the port number which you are adding is open and allowed to receive data. There are multiple ways to accomplish this, lets go one by one: CLI: Simplest and easiest way to add a port is via command line interface, you just need to traverse to $SPLUNK_HOME/bin directory and using the splunk universal binary you can do that. [splunk@ip bin]# ./splunk enable listen 9999 Splunk username: admin Password: Listening for Splunk data on TCP port 9999. Above command will require your Splunk admin credentials for adding/enabling the mentioned port number.  PS: If you want to disable it simply use disable instead of enable i.e. ./splunk disable listen 9999, basically what it does it adds a flag in your stanza and mark it as 1 < disabled = 1 >. Basically under the hood what is does, it creates a stanza in your inputs.conf  [splunktcp://9999] connection_host = ip Config file:  Another way to do it, is via ma...

Bringing data into Splunk (Continued...)

What happened behind the hood? When we added the new log file to be monitored via the graphical interface, it created and added a configuration item into inputs.conf configuration file. You can find the configuration file here: $SPLUNK_HOME/etc/apps/search/local/inputs.conf You can also manually edit this file and add your custom stanza, once done to notify Splunk about the changes, the daemon needs to be restarted. It will contain something like this: [monitor:///var/log/messages] disabled = false host = splunk_server index = idx_messages sourcetype = linux_logs Above block is known as stanza, lets decipher this :)  monitor: This is used to specify which logfile(s) you want to monitor i.e. you can mention a specific logfile as well as full directory lets say you want to monitor everything under /var/log directory, just mention "monitor:///var/log/" and Splunk will try to index everything which is there in that directory. disabled: Lets say you w...

Bringing data into Splunk

Image
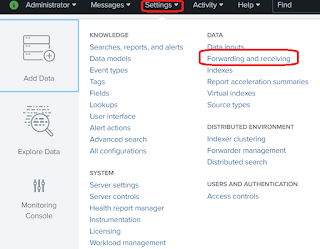
Now, lets dive deep into bringing data into Splunk. Splunk Enterprise can index any type of data, however it works best with data with timestamps. When Splunk indexes data, it breaks it into events based on timestamps. Every event or data which is indexed into Splunk should have a sourcetype ( helps to identify the type of data which is indexed ) assigned to it. In corporate environment, majorly forwarders ( ref: here ) are used to input data into Splunk but there are other ways as well in which you can get your data indexed to Splunk. Lets assume you want to monitor a log file of the local machine on which Splunk is installed then you can use the hyperlinks which are listed under "Local inputs" otherwise you can use the hyperlinks which are listed under "Forwarded inputs". For achieving that, you can navigate to "Settings" => "Data Inputs" => "Local Inputs" => "Add New" (NOTE: Make sure Splunk have a...

#4 Splunk sub(Commands) [timechart, geostats, iplocation]

Image
TIMECHART : Helps you to create a time series chart with respect to event statistics. Example: index=_audit | timechart span =5m count by action useother=f Above query will help to create a timechart with respect to an specific field(it this case its action) from the events. If you will notice, there is something called span (length of time for which the statistics are considered). In this case each bar(or line chart) in bar graph will be of 5 mins. Another things to notice is useother, this option specifies whether to merge all of the values which are not included in the results into a single new value called OTHER, accepted values t(true) or f(false). Statistics, will help you to see a table consisting of all the statistics fetched based on your query. Visualization, will help you to see the timechart. Select Visualization, helps you to select your preferred visualization type. GEOSTATS : Helps to create a cluster map based on your events. ...

#3 Splunk sub(Commands) [eval, round, trim, stats, ceil, exact, floor, tostring]

Image
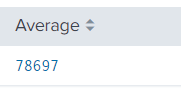
ROUND: Eval with round takes one or two numeric arguments, returning 'first value' rounded to the amount of decimal places specified in 'second value'.  By default it will remove all the decimals. Example: index=idx_messages sourcetype=linux_logs | eval new_rt= trim ( replace (response_time, "ms.", "")) | stats avg (new_rt) as Average | eval Average= round (Average) Remove all the decimal values. Example: | eval Average= round (Average,3) Rounded the value up-to 3 decimal places. Example: | eval Average= ceil (Average) Round the value up-to the next highest integer. Example: | eval Average= exact (Average) Give the output with maximum possible number of decimal values. Example: | eval Average= floor (Average) Round the value down to the nearest whole integer. Apart from this, there are other functions as well which are used by eval command, for instance pi (), sqrt () etc. TOSTRING: Hel...